Orienteering TechniquesHow can I improve?
- Home >
- Information >
- Orienteering Techniques
These tips and notes are based on a series of short articles written by Julia Crook who is a former WAOC Club Coach. They first appeared in a series of articles in the club magazine Jabberwaoc.
Books
Several books have been produced teaching orienteering techniques and may of interest if you are prepared to hunt them down. Some of these are:
- "Orienteering: The Skills Of The Game" by Carol McNeill
- "Orienteering: Pathways To Excellence" by Peter Palmer
- "The Complete Orienteering Manual" edited by Peter Palmer
The following notes will be helpful to newcomers first getting to grips with specific orienteering techniques and terms.
Map Familiarity
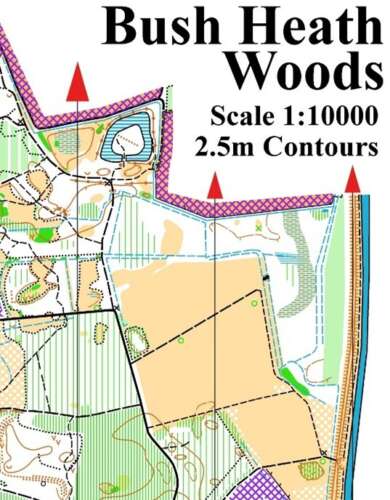
When you start orienteering, the biggest problem is lack of familiarity with orienteering maps. If you are familiar with OS maps, the use of white and orange colouration in particular can be confusing. Green obviously means trees, but it is easy to forget that white also means forested but more runnable. There really is no other way to train yourself at being better at interpreting the map than by going orienteering as much as possible in different areas and looking at maps after you've run.
Although orienteering maps are designed to internationally recognised standards, different mappers might represent the ground they are mapping in slightly different ways. It is always a matter of interpretation as to how more subtle features such as changes in vegetation are mapped, or whether a relatively small feature should be mapped or not. This may vary according to which part of the country - in East Anglia we tend to map relatively minor knolls and depressions for example, because there aren't any larger ones around. In more hilly terrain, there would be a different threshold for what is worth mapping. With experience, you will get used to what is likely to be mapped and what is not in a particular area.
Urban areas pose different challenges. Here, there is much less ambiguity about what is mapped and how it is represented, but the orienteer must look carefully to check that what might look like a good route choice does not cross any impassable barriers, and to understand what these look like on the map.
Handrails
When you first start orienteering you will be using "handrails" all the time. "Handrails" are line features such as paths, fences or streams. They are excellent navigational aids providing safe routes between controls. You simply follow the feature without having to keep looking at the map or compass. All courses up to and including orange will entirely use handrails, although on orange courses the control sites may be just off a line feature. Harder courses will also allow "handrail" navigation for many parts of the course (particularly in the South East where there are many paths) but these "handrails" may be on less obvious line features such as re-entrants or spurs, and taking a safe path route may not be the fastest route to the control.
Aiming Off
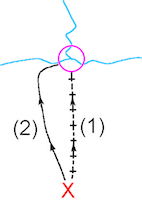
Aiming off is a technique allowing you to go on a bearing to an obvious feature, which you can then follow in to the control. Suppose you have a control on a stream junction and you are approaching it in a roughly perpendicular direction from point X (figure 1). Instead of taking an accurate bearing from X to the control and having to go slowly to make sure you keep on the bearing (route 1), you aim for example to the left side of the control and go on a rough bearing (route 2). This allows you to go faster to the stream and you know you will need to turn right along the stream to locate the control. An accurate bearing allows you to hit the control spot on and means you run the least distance, but unless you are very accurate with your bearing you may end up to the left or right of the control and then not knowing which way to turn when you reach the stream.
Attack Points
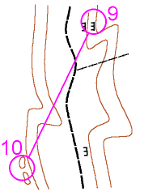
Attack points are very important in orienteering although in orange courses and below you will not be aware you are using them, as handrails lead you to the controls. An attack point is an obvious point feature or crossing of 2 line features reasonably close to the control that should be easy to find. You aim to find this first and then go more slowly into the control. Sometimes there may be several possible attack points and it is up to you to choose the one you think will be easiest to find and from which the control will be easiest to find. This is not always as easy as it sounds. Figure 2 shows a fairly simple example to illustrate what an attack point is:
Control 9 is on a crag in a forest to the east of a path and control 10 is on a hilltop in the forest to the west of the path. To carry out this leg you will almost certainly want to use the path as a handrail for a large part of the leg. You could cut down to the path and then pace count as you head south on the path until you think you have gone the right distance before heading on a bearing into the forest to locate control 10. This is risky because you would have to be very accurate in your pace counting. Instead you should notice the crag on the east side of the path not far from control 10. You can run fast along the path until you see this crag at which point you slow down and take your bearing to control 10, the crag being your attack point. It should be easy to find and when you get there you know exactly where you are allowing you to take an accurate bearing to the hill top and control 10.
Catching Features
A "catching feature" is typically a line feature or some large obvious feature. e.g. a lake beyond the control and perpendicular to your route which will "catch" you if you miss the control and overshoot. A catching feature may also be a line feature parallel to your route which will catch you if you wander off your straight line route. For example, suppose your control is in a small depression with a path beyond it , a stream to the right and a fence to the left. The path will catch you if you overshoot and the stream or fence will catch you if you veer off to the right or left from your desired straight route from X. Catching features can give you confidence to go a little faster because even if you make a mistake you will not go too far wrong because your route is contained.
Traffic Lighting
"Traffic Lighting". A useful skill in orienteering is the ability to break down a leg into easy, more difficult and tricky navigational sections (you may not always have 3 types of section in each leg) and to run at the speed appropriate to this difficulty. This is known as "traffic lighting". This means knowing when to go fast (green) such as when following a handrail to an obvious feature, knowing when to slow down (amber) such as when you are approaching a control which is not in a very difficult area and when visibility is good, and knowing when to walk (red) such as when finding a control in a very complex contoured area.
Compass and Pace
Being able to judge distance is a very useful skill in orienteering. It can help you know when to start slowing down and look for your attack point or control, and it can help you know when you've gone too far and missed your control. One way of helping you know how far you have gone is to count paces - typically you will count double paces. You will need to know how many double paces you do to 100m. I do about 40 when running through open forest, but if you've got long legs and run fast you may well do nearer 30. Obviously this also varies depending on the type of terrain you are running through.
Being able to use the compass is an essential skill in orienteering, firstly for getting the map the right way round, but also for checking you are going in the right direction along a line feature, for helping you determine which path/stream you are on or crossing and for going on rough bearings as well as taking accurate bearings when there are no line features to follow. Compass and pacing is the only way to find a small feature such as a pit in an otherwise featureless forest (other than using the headless chicken approach!).
Visualisation and Simplification
When you plan your route you need to think about what you will see on the ground, i.e. you are interpreting and visualising the map. You need to form a 3-dimensional picture from the 2-dimensional map. A map covered in intricate contour detail is particularly difficult to visualise, but the best orienteers can do this. Being able to visualise contours is very useful because they tend to be reliably mapped: contours rarely change, whereas vegetation and other features are changing all the time and the map might not reflect current reality. For example forested areas can be chopped down, paths can disappear and new paths can appear.
If the distance of the leg is short you may well visualise everything between the controls on the map, but if the leg is quite long you need to pick out the big features that you will see and not worry about the little ones on the way (until you get near to the control), i.e. you are simplifying. You need to do simplification to be able to use the Traffic Light technique, e.g. if the first big feature is a path crossing your route, you can ignore all those pits, thickets and knolls on the way to the path and therefore run fast.
Relocation
This is about finding out exactly where you are when you are lost. "Lost" can mean several things from "you haven't the faintest idea where you are on the map or even if you are off the map", to "you have a reasonable idea of the region you are in but are not sure of your precise location". If you have no idea where you are then relocation is very tricky. Hopefully you have some idea of where you are. If you can remember when you last knew exactly where you were and have some idea of what you have seen since then, by studying the features around you and matching them to what you see on the map in the area you think you are in you should be able to work out where you are. Good visualisation ability helps a lot here. If there are no distinct features in sight, you will have to decide which is the best direction to travel in such that you will hit an obvious feature shown on the map. In an area where there are several paths this may not be too difficult providing you can distinguish between them. The difference in technical difficulties 5 and 5* is purely on how easy it would be to relocate.
Route Choice
Once you get to orange standard courses you should be getting some route choices. Route choices may be deciding between going round a path or straight through a wood, going over a hill straight or a longer way round on the flat, or even a choice of whether to go to the right or left of a bush. The best choice for you may not be the best for someone else. It all depends on your level of fitness and navigational ability. Different routes may provide different attack points, one more reliable than another. So you will need to weigh up length, climb, runnability and ease of navigation of each route. It can be of great benefit to compare routes with other people after an event. Often someone will have taken a route that you never spotted while in the forest. If you can compare split times too then you can get a good idea which is the better route. If you find yourself looking at the map for some time trying to decide between two routes, you'll probably find that the routes are not that different and you should just get on and implement one choice. The time spent weighing up the differences will probably outweigh any benefit gained. One tip though, once you've decided on a route choice, it is best to stick to it unless you have a very good reason to change your mind.


